| New User Tutorials for ZenCart 1.3.8a |
January 2009 |
|
| ◄BACK | ||
| Adding Categories Now it's time to start laying out the store by adding categories. These will be the main groups of items you will have on your site and give people an idea of where to start clicking to find what they want. If you're running a Photography store then you'll most likely have categories like:
You can have as many categories as you want and by default they will list themselves alphabetically unless told to do otherwise and I'll address that shortly. There is also a setting you may or may not want to change that controls whether or not the categories are displayed in the header as links. If you have a lot of categories or just don't like the way it looks, don't worry, we can turn it off. Let's add a category first and look at some screenshots so you can see what's going on here. Start by going to: CATALOG > CATEGORIES & PRODUCTS Here you'll see the area we'll be working in, below are the instructions for adding your categories to the site, to add more then one category just complete the steps below. |
||
|
--------------------------------------------------------------------------------------------------- |
||
|
Step One: Getting
Started
This is a really
simple thing so we won't spend too much time on it, I want to give you
the basics in order to get you up and running as quickly as possible and
point you in the direction to get more information if you need it.
Take a look at the
image to the right and you will see what we have to work with. Start off
by clicking on the
|
||
| --------------------------------------------------------------------------------------------------- | ||
Step Two: Filling in
the Information
|
||
|
--------------------------------------------------------------------------------------------------- |
||
|
Step Two: New buttons
to play with !!!! Now we're at the screen we started with, but now it looks different because it's now displaying the categories we've added. Here are some things to look at on this page now.
There's also a series of dots on this page to the right now and I will describe them here because you'll want to know what they do before you accidentally delete a whole category of products and email me screaming to fix it.
|
||
|
--------------------------------------------------------------------------------------------------- |
||
|
Step Three: Adding
Subcategories On your site you should now have a category or two showing in the admin section where we're at, if not, make them now or I will flog you with a wet noodle !!!! Keeping with the Photography shop
idea, let's take our first category of Cameras. Now in our store we're
going to have 35mm and Digital Cameras so we need to add those as
subcategories inside the Click on the little folder icon
next to the category name, now you're pretty much in the same spot you
started except you're actually in the Cameras category. Here is where you
will add your 35mm and Digital Camera categories just like you did for the
main categories. you'll also see the same buttons as mentioned above. You
can repeat this process if you want to further break things down. So if
you have 3 mega pixel Digital Cameras and 5 mega pixel Digital Cameras,
you would click on the
|
||
|
--------------------------------------------------------------------------------------------------- |
||
|
Step Three: Adding
Images
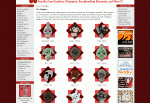
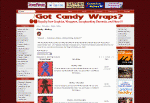
and Descriptions to Categories While you are adding your categories you had the option to add images. What these do is just make the categories look spiffy by allowing you add an image the represents that category. The best example I can give you of this is the image to the right taken from our site at http://www.gotcandywraps.com Here you can see that each of the categories has a name and an image with it. The image shows you a representation of what's inside the category. This can be useful in marketing your products on your site because people are very visual and would much rather click on an image then a text link. If you look at the second image, you will see that once inside one of the categories, the image set for the category becomes more like an icon in the upper left there. Additionally, both of the images to the right show you what a category looks like with the description added and images together, kinda snazzy huh ???? |
||
|
--------------------------------------------------------------------------------------------------- |
||
|
Step Four: The Customer's View Now, we've got the site coming together, let's take a look at the front of it real quick. What I want you to look at in the screenshot to the right is across the top there, the light grey links that say "TEST CATEGORY 1" etc...... right now those actually look fine, but imagine if I had 10 or more main categories. It would be just a mass of jumbled up words there. So now you have the option to do something about that by going to: CONFIGURATION > LAYOUT SETTINGS > Categories-Tabs Menu ON/OFF Here you can select whether to turn that bar off so that it doesn't show up on the site. I would suggest adding all your categories first and looking at it, then decide for yourself. The second screenshot shows you what it looks like with the tabs menu turned off. This is just one of the things we'll be working on later when we touch up the site to make it more presentable.
|
||
|
--------------------------------------------------------------------------------------------------- |
||
| Now is the time you should go ahead and fill in your categories. Don't worry, you can always go back and add more or remove some. You'll need to have at least one category to follow the next step in this tutorial. Click on NEXT to go to it. | ||


