| Uploading a Template via FTP
** IMPORTANT ** if your website is
hosted and zencart was installed and customized, following this portion of
the tutorial will overwrite any template files on your site that were
customized and install the basic CherryZen template. As a matter of
course, Valhalla Computers installs the CherryZen template and customizes
the logo and possibly other files to meet your needs.
At this point you can go ahead and close your ZenCart
windows for a while because we're going to learn how to upload a ZenCart
template to your website so you can change your site from the standard
green template that is automatically loaded with ZenCart.
Before we go any further, we need to get a new
template to load up to our website. If you click on this link
HERE you will be taken to the official ZenCart website where
you will download a template to use. For the purpose of this tutorial
we're going to pick a nice one called Cherry Zen which you will find about
halfway down on the page. To download this, click on the name of the
template and you'll be taken to the download page for the template.
On this page you can also see that there's
additional information from the template author, as well as the versions
of ZenCart the template is compatible with. There's a smallish light blue
link about 3/4's of the way to the right named
"DOWNLOAD NOW". Go ahead and click on it to download the
template to your computer.
If you don't have a way to expand a ZIPfile, you
should really download
WinZIP
or WinRAR as
you will need one of these to expand zip files as well as to create them
later on. You can find
WinZIP
and WinRAR by
clicking on the linked names I just mentioned.
While we're at it, there's one other program you're
going to need to follow the rest of this tutorial and it's called
FileZilla, which is a free FTP client that will allow you to connect to
your website and transfer the files from your computer to the server. You
will need to download the CLIENT, not the server version.
Click
here to goto the FileZilla website
and download it as well. Once you've downloaded it go ahead and install
it, follow the directions offered on the installation screens and you'll
be fine.
The first thing we need to do is expand the zip
file so that we can load it up properly onto the site. Left click one time
on the Cherry Zen zip file you downloaded from the ZenCart site, then
right click and you're looking for something that says Extract Here
or Extract Files depending on what it is you're using to expand
files. What you will wind up with should be a folder with a lot of other
folders and files inside it. That's our template.
What we need to do is fire up FileZilla so that we
can load this new template to the site so we can use it later on to make
our site look different. You should have an icon on your desktop to start
FileZilla up, go ahead and double click on it to start the program. Once
you've got it open follow the steps below to load the template to the
server.
|
--------------------------------------------------------------------------------------------------- |
|
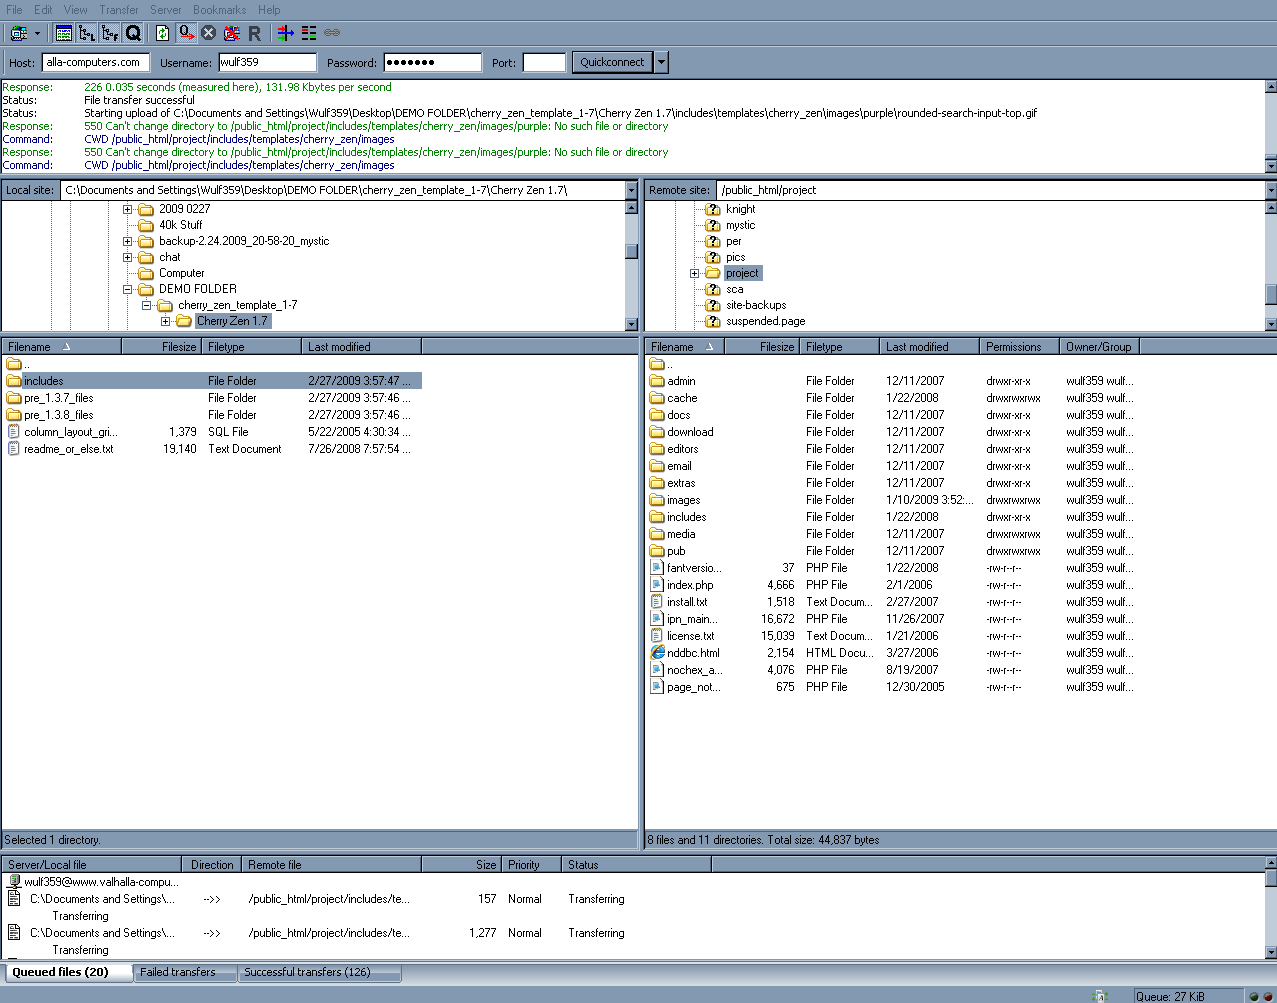
Step One: Connecting to your site
In the image to the right you will see that I've numbered a few
things for you to look at. Follow these in order and within no time
you'll be making your first FTP connection to your website.
- HOST -
This is where you will enter the name of your site, for example,
here is where you will enter www.yourdomain.com and as
before, replace yourdomain with the name of your domain and if
need be change the .com to .net or .biz. or any other extension
you may have.
- Username -
This is the username provided to you by your hosting provider for
accessing the site via FTP. Valhalla Computers customers, this is
the same username you use to login to your cPanel and was provided
to you at the time your hosting account was created.
- Password -
This is the password provided to you by your hosting
provider for accessing the site via FTP. Valhalla Computers
customers, this is the same password you use to login to your
cPanel and was provided to you at the time your hosting account
was created.
- Port -
Here you should enter 21 as the port you'll be connecting to. If
this doesn't work then you will need to contact your hosting
provider and ask them what port you connect to for FTP access to
your server. Valhalla Computers customers please use port 21.
- Quickconnect -
This is the moment we've been waiting for, CLICK IT, and if
everything goes right, you will see a lot of flashy movement in
the FileZilla windows as the program connects you to your website.
NOTICE: You may get a warning from your computer asking if you
want to let this program connect to the network/internet. Allow it
to connect or you will not be able to connect to your site or load
files.
|
 |
|
--------------------------------------------------------------------------------------------------- |
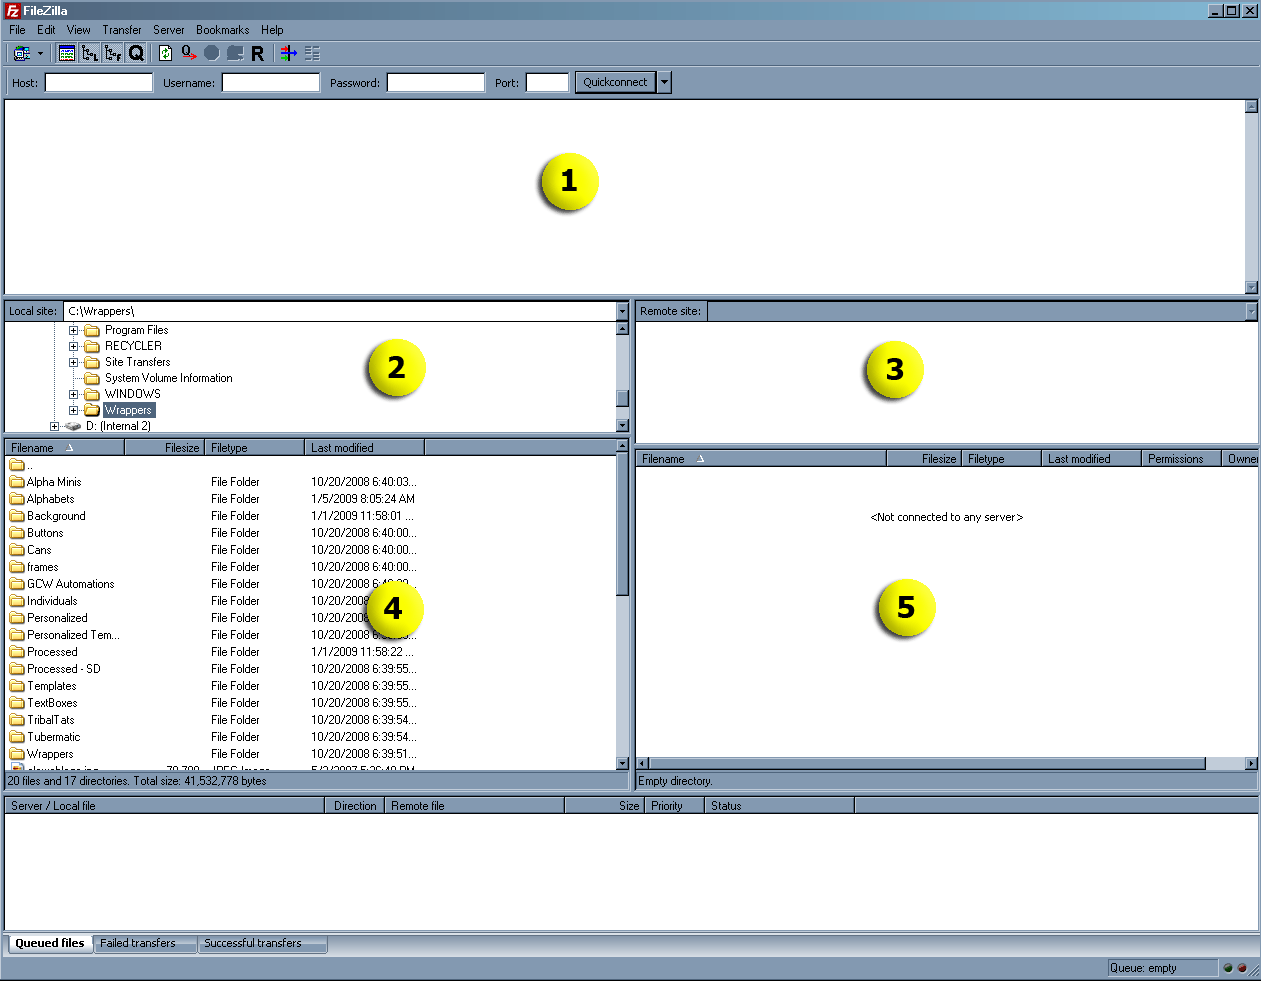
| Step Two:
Getting where you want to be
Assuming that you connected to
the site via FTP successfully, we now need to navigate to where we
can load our template up. I want you to take a look at the image to
the right and follow the numbers below. Use IMAGE ONE to the
right for reference.
- Information Pane:
for the most part you can disregard whatever comes up in this
panel, however, if you are trying to upload a file and it's not
going on the server, here is where you would look for an answer.
Problems are generally in red and give you information you can use
to rectify any problems. The most common problem is insufficient
disk space on your server. The quick and simple fix, contact your
hosting provider and purchase more space, or remove some files
from the server.
- Local Site:
This is generally where you will navigate to the folders or files
you want to transfer that ARE ON YOUR COMPUTER. It works just like
Windows Explorer and when you click on a folder, you will see the
contents in Pane 4.
- Remote Site:
Just like with Pane 2, this is where the files and folders show up
ON YOUR SERVER and it works just like Pane 2 except that the files
show up in Pane 5.
- LOCAL Files:
Here is where you will see the folders and files on your
computer. In the image to the right, you will see a list of my
working folders in Pane 4.
- REMOTE Files:
Just like in Pane 4 except these are the folders and files ON THE
SERVER.
If I've completely lost you at this point,
don't worry. Below I will go into more detail on what all this means
and how we use it to move files to the server, and in this case a
template. The principles outlined above and below are the same for
adding files to the server such as zip files, images, etc. Product
images are handled by the cart automatically so you do not need to
FTP them to the server as ZenCart does that when you add a product.
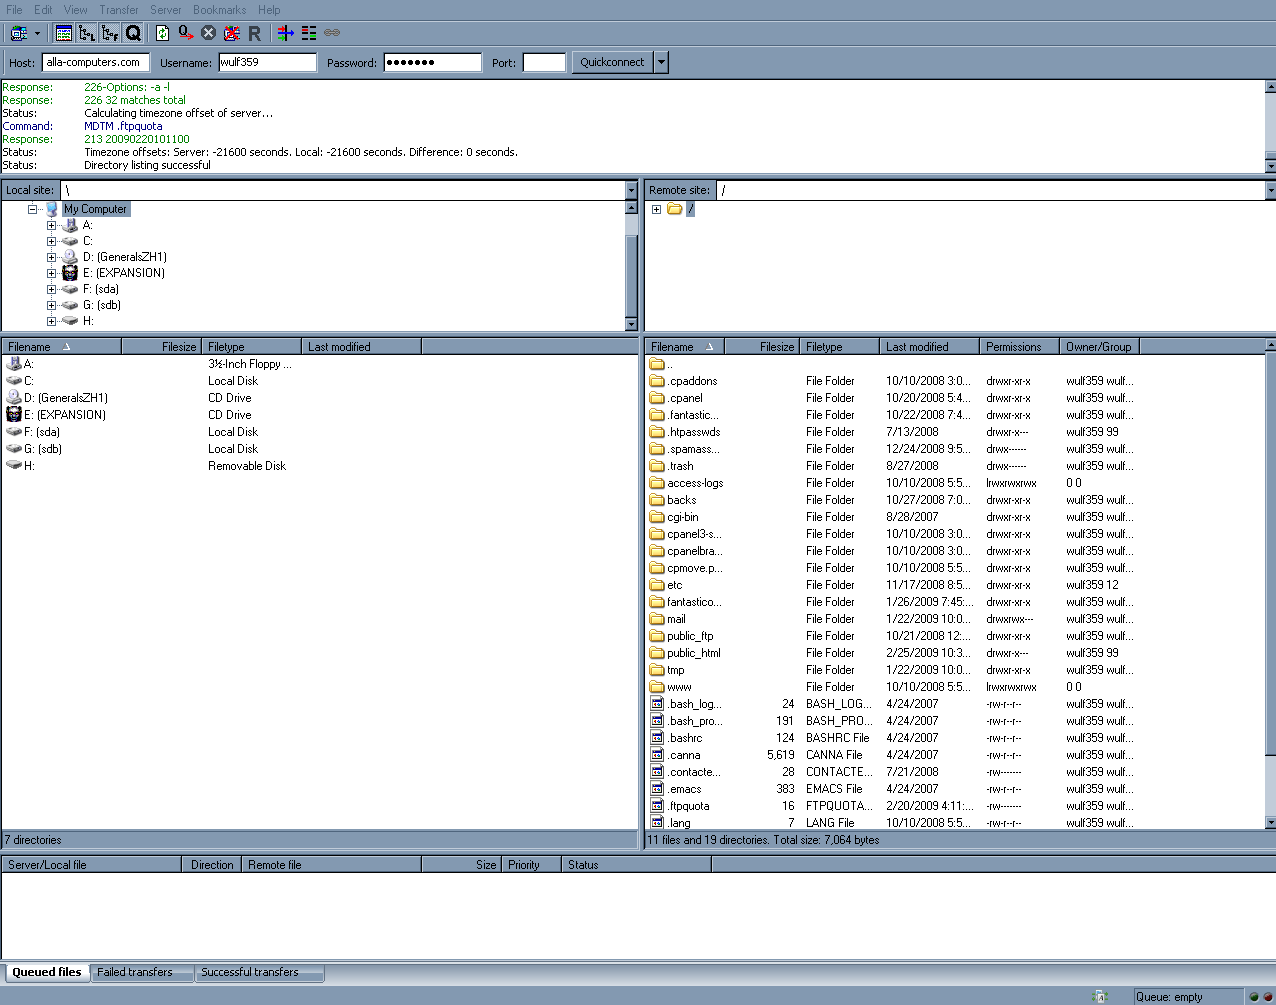
Now to get where we are going, we need to
find out where ZenCart is installed. For those of you with Valhalla
Computers as your hosting provider, this will be somewhere in the
/public_html/ directory. So in Pane 5, double click on /public_html/
and look for a folder called INCLUDES. If you do not see
that, then look for a folder called cart or store or perhaps shop.
Double click on that and try to locate the includes folder. If you
have problems with this part feel free to yell and throw things at
me, but make sure you send me an email so I can help you. Use
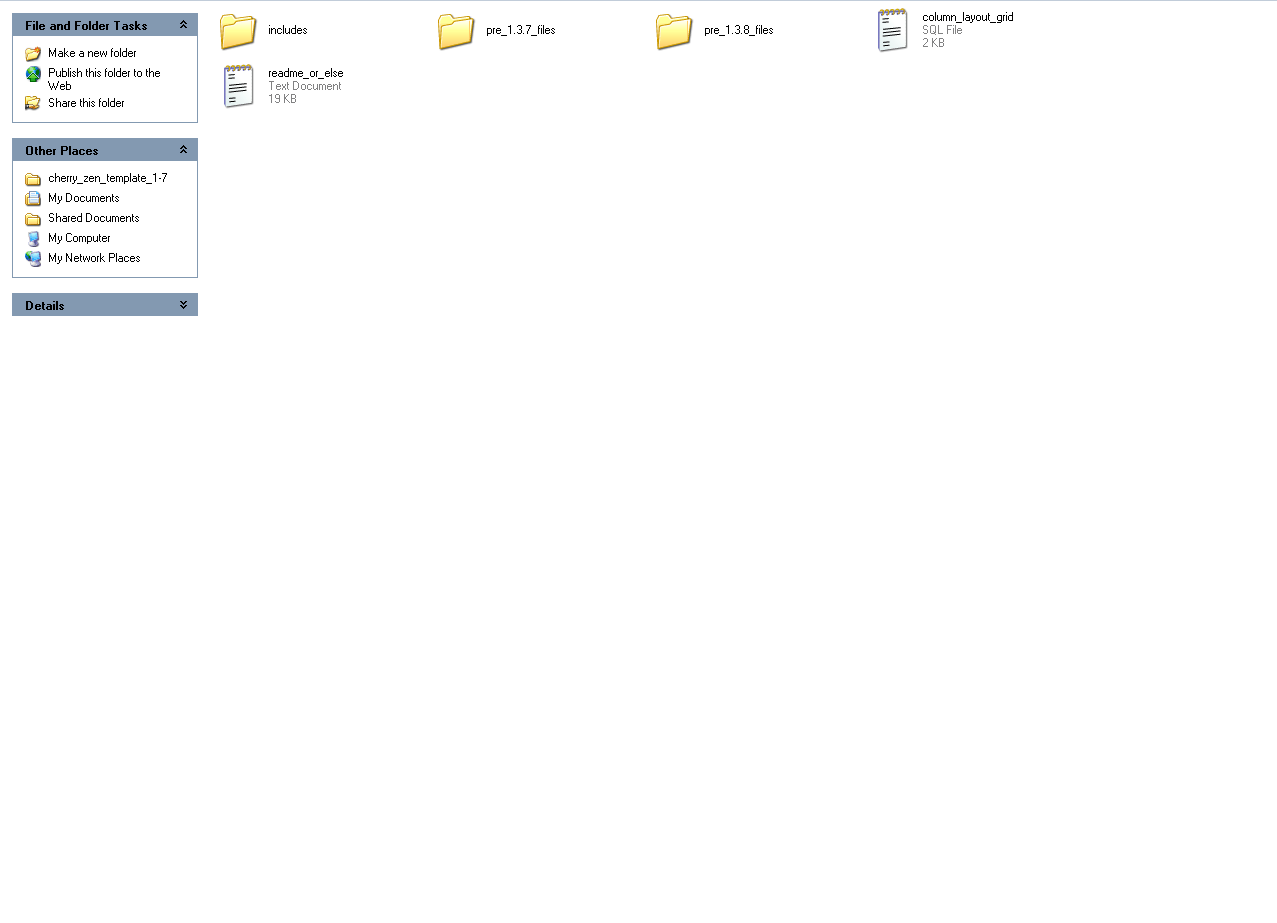
IMAGE TWO and IMAGE THREE to the right for reference.
Now let's take a leap of faith and assume
you've found the INCLUDES folder. This is where we want to be to
load this template up. Do not go into the INCLUDES folder, I just
wanted you to use this as a landmark or point of reference so you're
in the right spot.
** WARNING** If you get to
this location on the server and already see a folder called
CherryZen
or something similar, STOP AND DO NOT GO ANY FURTHER. This means
that you already have this template installed, if you have another
template you wish to install then proceed. Reloading the CherryZen
template will overwrite any custom files that may have been added
and you will not be able to recover them.
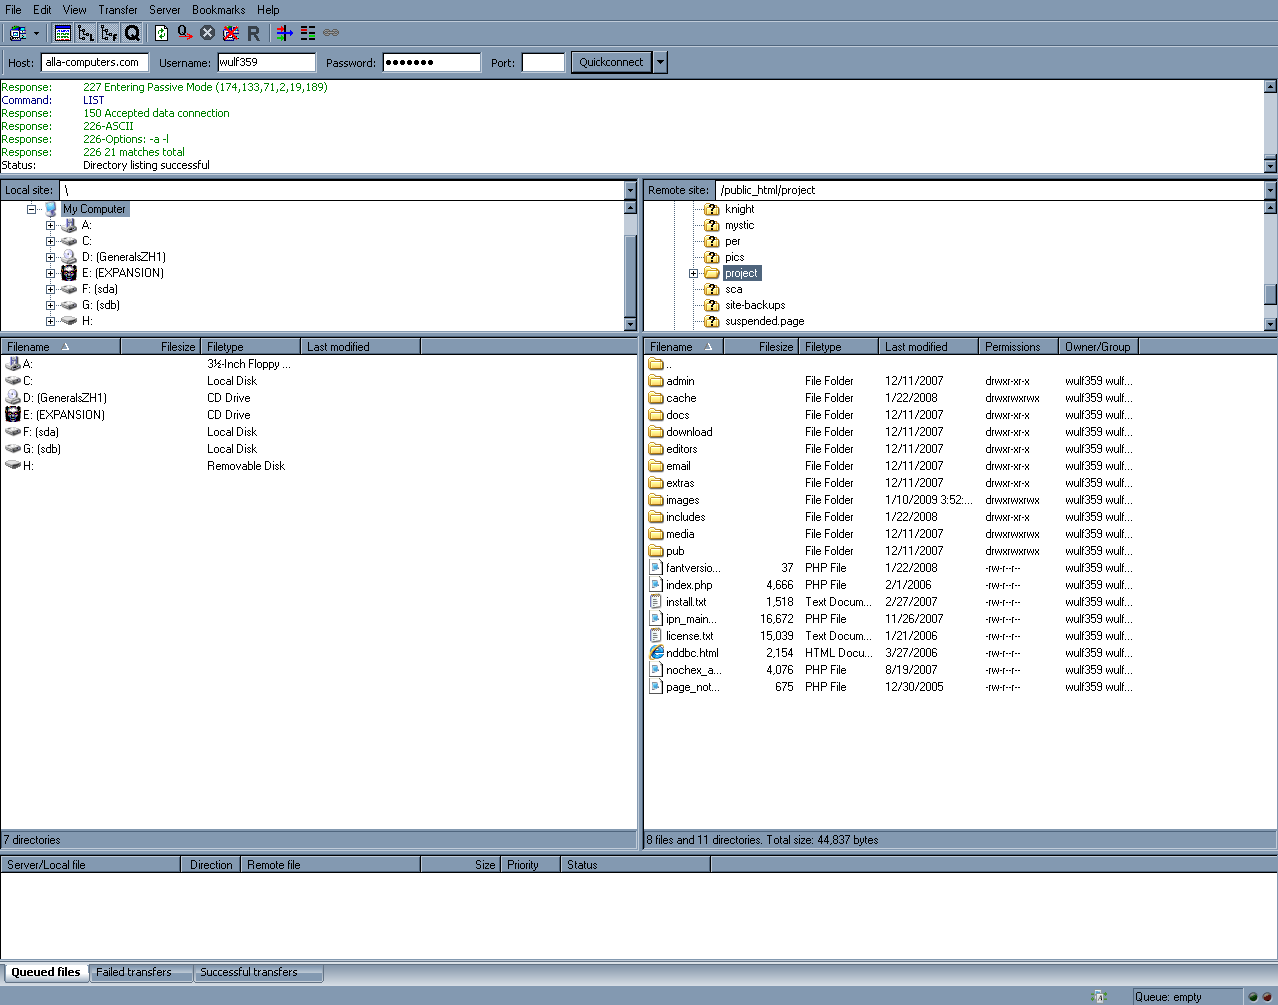
So now we know where to load
the template onto the server, let's find it on your computer so we
can load it up. In Pane 2 you will need to work your way to the main
directory or drive where you saved the template. What you want to
end up with is the Cherry Zen template folder showing in Pane 4. Now
for a tricky part, not all compressed files extract the same way
every time. With that in mind we need to look in the Cherry Zen
folder to see just what files we need to load to the site.
In Pane 4, double click on
the Cherry Zen folder, this will either bring you to a group of
files and folders OR to another Cherry Zen folder. If you see a
folder here called INCLUDES then you're good and right where you
need to be. If you don't see that folder, double click on the Cherry
Zen folder that's in the Cherry Zen folder and you should see the
INCLUDES folder now. It's important that you have this right or the
template will not be available for selection in the admin section
later and you'll end up throwing stuff at me and yelling at me
again. If you get stuck, email me. Use IMAGE FOUR to the
right for reference.
NOW, we are finally
ready to do something... in Pane 4, drag the INCLUDES folder over to
Pane 5 and let it go. It should now start loading up to the server.
If it asks you to overwrite anything or that the file already
exists, let it overwrite the file and continue loading up. IMAGE
FIVE shows what you should see in FileZilla if everything has
gone according to plan.
Provided everything went
smoothly and properly, you're done with this part of the tutorials
and can move on. We'll know shortly if you did this right or if I
need to rewrite this tutorial to explain it better. |

Image One
Image Two
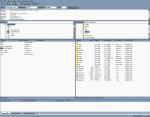
Image Three
Image Four
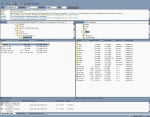
Image Five |
|
--------------------------------------------------------------------------------------------------- |
|